

July 17, 2010
Resizing a VMWare LVM partition
 Photo courtesy of Tazintosh |
My problem was that I was running a virtual machine in VMWare that didn't have enough hard drive space. The underlying host machine did have more hard drive space. I wanted to increase the amount of disk space on the hosted virtual machine. Because linux tools (the main one being gparted) do not support increasing the size of an LVM partition this was hard. |
I understand how to do this now, but figuring out the right sequence of things to do required me to learn about LVM (logical volume management) and was a bear.
For starters:
The host machine was running Ubuntu Linux 2.6.28 server edition.
The virtual machine was runnning Ubuntu Linux 2.6.24 desktop edition.
The first thing to do was to increase the size of the disk that VMWare was giving to the virtual machine. I did that in the VMWare control panel while the virtual machine was shutdown. Alternatively I could have created a new hard disk for the virtual machine. It would have ended up being the same, although I don't know if there is a performance difference between the two.
Next I booted the virtual machine off of a live Ubuntu 10.04 iso image. This gave me a gui environment running on the virtual machine, but didn't mount the disk.
If gparted supported resizing an LVM partition I would have been nearly done. I could have opened gparted and resized the partition into the newly available space. gparted did not support resizing LVMs, so I had to learn more.
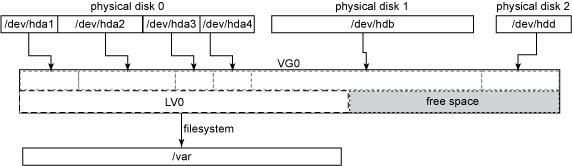
What I needed to do next was explained by this image taken from here.
From the gui, I opened a terminal window and got root access, "sudo su".
I created a new partition in the empty space using "fdisk". I set the partition type to "8e" which is "LVM". Then I wrote out the changes. At this point I had to reboot my virtual machine back into the live CD environment in order to get the changes to be seen when I ran "fdisk -l".
Next I made the new partition into a physical volume, (I ran "apt-get install lvm2" first) with the command, "pvcreate /dev/sda3". Verified it worked with "pvdisplay"
Then I added the new physical volume to the existing volume group, "vgextend Ubuntu /dev/sda3". I verified that it worked with "vgdisplay".
Then I extended the logical volume to include the new space with "lvextend -l +100%FREE /dev/Ubuntu/root". I verified that it worked with "lvdisplay"
Then I extended the underlying filesystem into the new space after cleaning it up with, "e2fsck -f /dev/Ubuntu/root" and then "resize2fs -f /dev/Ubuntu/root"
Then I ejected the .iso image from the virtual machine, rebooted it and the new disk was bigger! Yay! (In reality this took me a lot longer to figure out.)
One other useful command was "vgchange -a y" this enabled the Live CD Linux version to mount /dev/Ubuntu/root.
Thanks to this website for some insight into this.
Along the way I also shrunk the LVM partition and it's about the same thing in reverse, but you just have to make sure that you don't shrink things so much that you lose data. There are options in the tools that find out exactly how far you can go which was helpful. man pages are your friends.
Posted by djp3 at July 17, 2010 10:10 AM | TrackBack (0)This guide was perfect. Thanks a bunch man! You took the pain out of trying to figure all this out.
Posted by: Spike at November 18, 2010 6:24 PMThank you.
Posted by: mariusc at May 27, 2011 4:22 AMThank you so much, that worked flawlessly! You saved me hours of trial and error
Posted by: pierrickuk at August 17, 2011 7:05 PM